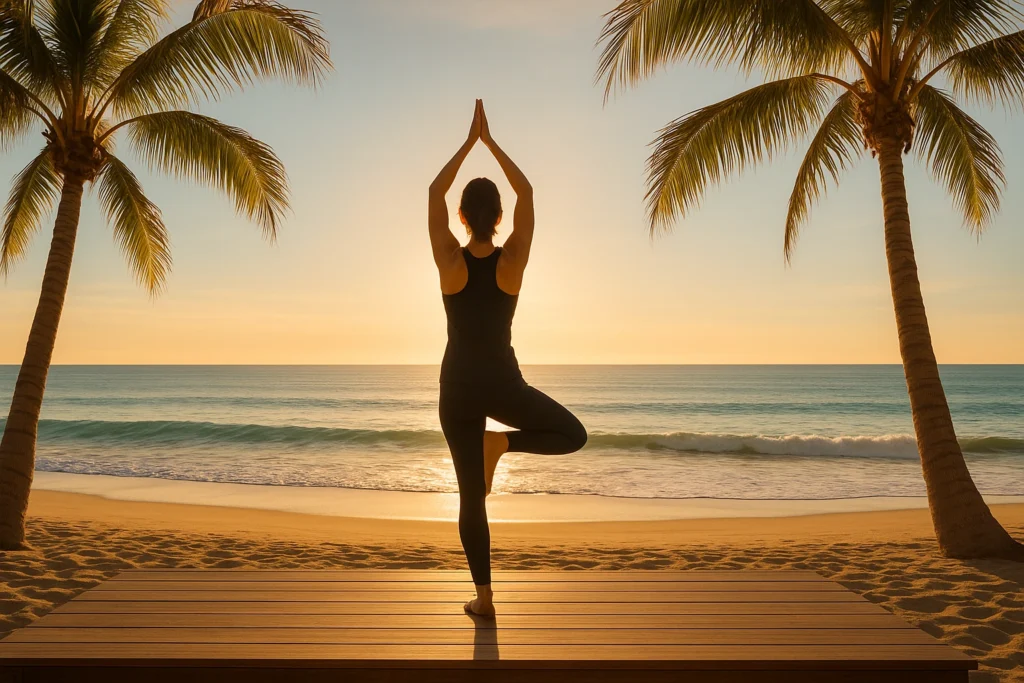
You do not need deep flexibility to train your glutes with yoga. This yoga glutes workout uses Chair, Warrior III, Bridge, and tabletop movements to challenge hip extension, single-leg control, and lateral hip stability. Use a wall, chair, or block when balance or floor reach is the limiting factor; the goal is controlled effort, not copying the deepest version of a pose.
If you want to start now, jump to the Short or Full workout flow, then use the pose guide for form cues and easier variations. If mobility is the bigger obstacle, the yoga flexibility guide gives you a gentler route alongside this strength-focused practice.
This post contains affiliate links. If you purchase through them, we may earn a commission at no extra cost to you. As an Amazon Associate, I earn from qualifying purchases. Learn more.
Table of Contents
- Why Use Yoga for Glute Strength?
- What Your Glutes Do in This Routine
- Before You Start: Warm-Up, Props, and Cues
- Choose a Short or Full Workout Flow
- 10 Poses and Movements for Glute Strength and Mobility
- How Often to Repeat This Workout
- 28-Day Glute Practice Tracker
- Frequently Asked Questions
- Build the Version You’ll Actually Repeat
Why Use Yoga for Glute Strength?
Yoga will not replace every kind of strength training, and it does not need to. What it adds here is time under tension, controlled transitions, balance, and single-leg work in the same practice. If you also lift weights, think of this routine as another way to train hip control rather than a superior substitute; the yoga for weight training guide shows how the two approaches can fit together.
For this post, the useful question is not whether a pose can “sculpt” one body part. It is whether the movement gives your glutes a job you can control. That is why the sequence mixes squatting, hinging, bridging, side-hip work, and supported balance instead of relying on one pose.
If lower-back discomfort is part of why you are here, keep the promise modest. NCCIH’s evidence review finds a small overall benefit from yoga for low-back pain, but this routine is exercise rather than treatment.
What Your Glutes Do in This Routine
The gluteal group includes three muscles with overlapping jobs. You do not need to isolate each one perfectly to make the routine useful:
- Gluteus maximus: contributes strongly to hip extension, the action you use when rising from a squat, climbing stairs, or driving the hips upward in Bridge.
- Gluteus medius: contributes to moving the leg away from the midline and helps control the pelvis during single-leg work.
- Gluteus minimus: works with the other lateral hip muscles during abduction and pelvic control.
The practical takeaway is simple: use more than one movement pattern. Chair and Bridge emphasize hip extension, while Warrior III, Half Moon, and Fire Hydrant ask for more single-leg or lateral hip control.
Before You Start: Warm-Up, Props, and Cues
A Short Warm-Up
Give yourself a few minutes to move before the stronger poses. You can use this simple sequence:
- Gentle Cat-Cow: 5–10 easy rounds.
- Bird-Dog: 5–8 controlled repetitions per side.
- Leg Swings: a comfortable range for each leg while holding a wall or chair if needed.
- Marching in Place: 1–2 minutes at an easy pace.
Simple Cues Used Below
Brace gently means firm the trunk enough to stay steady while still breathing. Hip-width apart means placing the feet or knees roughly under the hip joints, not forcing a particular stance. When a cue says to engage the glutes, think about creating the movement with control rather than squeezing as hard as possible.
What You’ll Need
- Yoga mat: useful for grip and floor comfort.
- Comfortable clothing: anything that lets you move freely.
- Wall or sturdy chair: a free first option for standing balance support.
- Optional block: useful when the floor feels too far away in supported standing poses.
You can still do most of this as yoga at home without buying special gear. A wall or sturdy chair covers many of the support needs without adding more gear.
Use Support Before You Chase Depth
A useful version of a pose feels challenging but controllable. If you lose your balance, hold your breath, or feel pain, reduce the range or use support. The deepest version is not the goal.
If balance or reaching the floor is what limits the standing poses, a basic foam block can help in Warrior III, Low Lunge, and Half Moon. The Gaiam Yoga Block is a straightforward option if you do not already own one; skip it if you already own a suitable yoga block or you can reach the floor comfortably.
Choose a Short or Full Workout Flow
You do not have to do all ten poses every time. Choose the route that fits today, then use the detailed pose guide below for form cues and easier variations. The tracker uses Short practice and Full practice on purpose: both count when they fit your day and you can recover comfortably.
Short Practice
- Warm up: a few rounds of Cat-Cow, Bird-Dog, or easy marching.
- Choose one supported standing pose: Chair, Low Lunge, or Warrior III with a wall or chair.
- Add one floor strength pose: Bridge, Fire Hydrant, or Donkey Kicks.
- Finish with an easy stretch: Figure Four or a comfortable Pigeon Prep variation.
This is the better route when time, energy, or balance is limited. One controlled round is more useful than rushing through the whole list.
Full Practice
- Warm up for a few minutes.
- Standing work: choose 3–5 of Chair, Warrior III, Goddess, Low Lunge, and Half Moon.
- Floor work: choose 2–4 of Bridge, Locust, Fire Hydrant, and Donkey Kicks.
- Cool down: use Figure Four or Pigeon Prep, then rest in a comfortable position.
Start with one controlled set or a few steady breaths per pose, then add volume only when your form and recovery stay comfortable. If you want a quieter cooldown, these recovery yoga poses can take over from there.
If time is the reason you’re choosing the shorter route, the free 10-minute chair-yoga routine gives you another brief practice to fall back on.
Get the 10-Minute Chair Yoga Routine
Confirm to get the routine and yoga tips. Unsubscribe anytime.
Something went wrong. Please check your email address and try again.
10 Poses and Movements for Glute Strength and Mobility
Use this section as the reference for the route you chose above. You do not need the hardest version of any pose for the sequence to work; pick the variation that lets you keep breathing and control the movement.
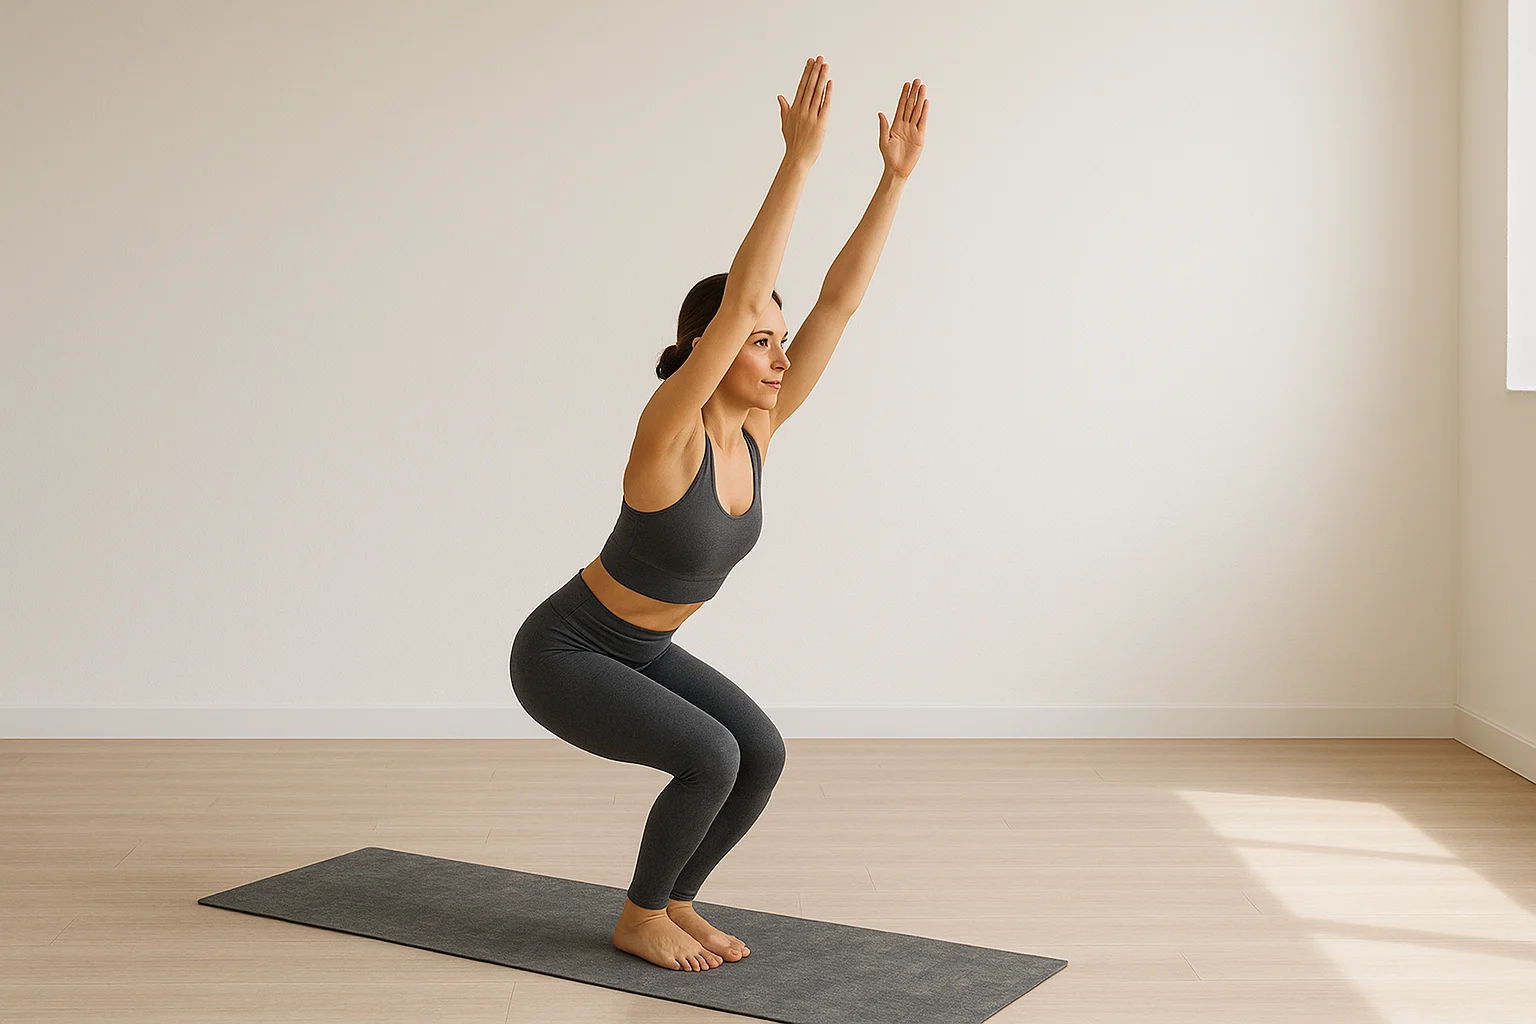
1. Chair Pose (Utkatasana)
How to Do It
Chair is a squat-shaped pose that asks the glutes and thighs to control the lowering and rising motion.
- Stand with feet about hip-width apart or a little closer.
- Send the hips back as if you are reaching for a chair.
- Keep the chest comfortable rather than forcing the arms overhead.
- Press through the feet and keep breathing.
- Hold for a few steady breaths, then stand up slowly.
Key Cue
Keep the knees tracking in the same general direction as the toes and use only the depth you can control.
Easier Version
Sit back toward a wall or actual chair, or keep the hands at the hips.
If You Want More Challenge
If the pose feels steady, hold for one or two extra breaths or use a slightly deeper bend.
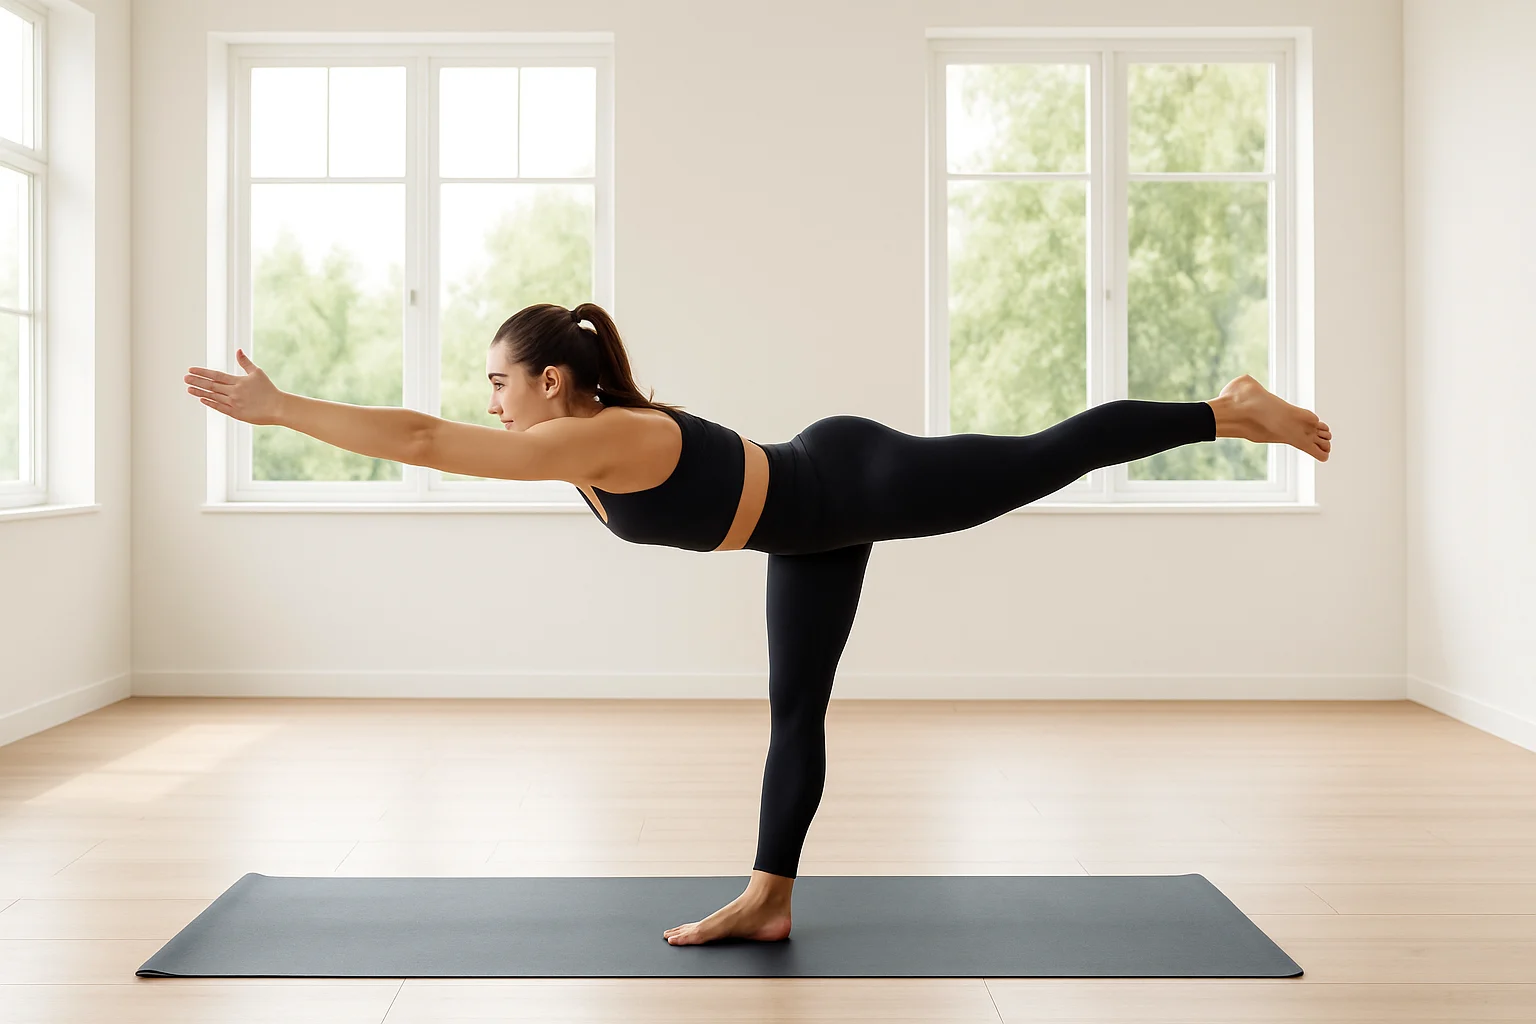
2. Warrior III (Virabhadrasana III)
How to Do It
Warrior III combines a hip hinge with single-leg balance, so support is a feature, not a failure.
- Stand facing a wall or chair and place the hands on it.
- Shift weight into one foot and hinge forward from the hips.
- Let the other leg extend behind you only as high as you can keep the pelvis controlled.
- Keep a soft bend in the standing knee if that feels better.
- Take 3–5 steady breaths, then switch sides.
Key Cue
Think long from the crown of the head through the lifted heel rather than trying to lift the leg higher.
Easier Version
Keep both hands on a wall, chair, or blocks and keep the back toes on the floor as a kickstand.
If You Want More Challenge
Use lighter fingertip support only when you can stay steady; keep support within reach.
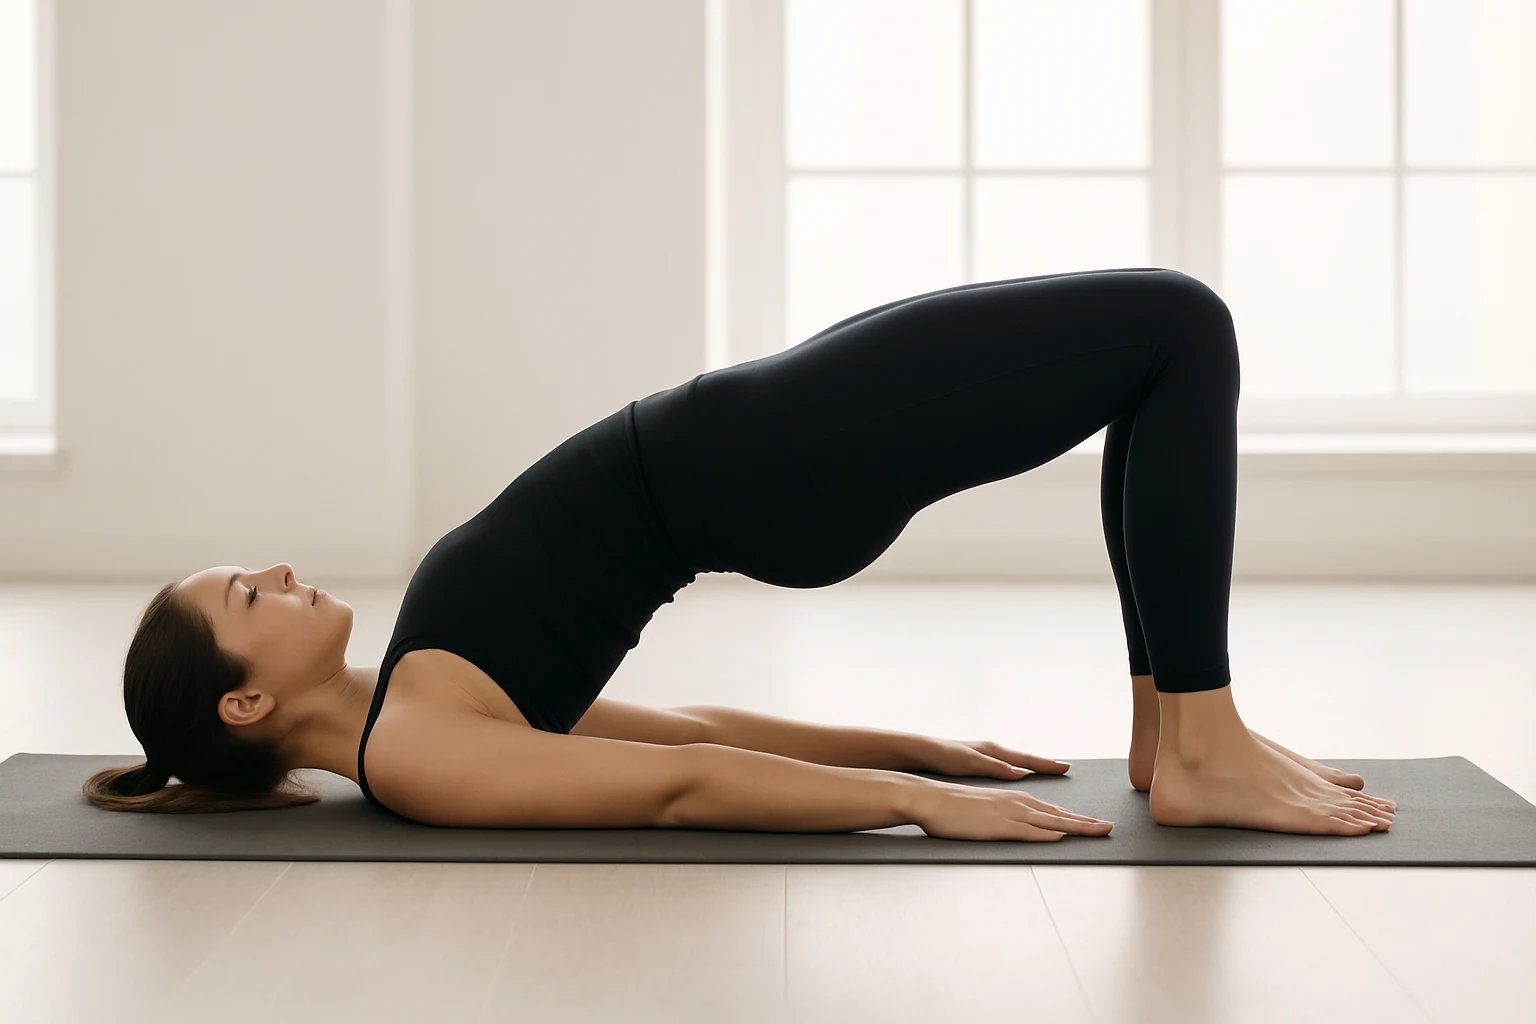
3. Bridge Pose (Setu Bandhasana)
How to Do It
Bridge loads hip extension from the floor, which makes it a useful option when standing balance is not comfortable.
- Lie on your back with knees bent and feet on the floor.
- Place the feet about hip-width apart and close enough that the position feels stable.
- Press through the feet and lift the hips to a comfortable height.
- Keep the ribs and neck relaxed rather than pushing for maximum height.
- Pause for a few breaths, then lower slowly.
Key Cue
Let the hips rise from the glutes and legs while keeping the knees from collapsing inward.
Easier Version
Lift only partway, or keep the hips on the floor and practice pressing evenly through both feet.
If You Want More Challenge
Add a brief pause at the top or one extra controlled repetition before considering harder variations.
4. Goddess Pose (Utkata Konasana)
How to Do It
Goddess uses a wide stance to challenge the hips and thighs while the torso stays upright.
- Step the feet wider than hip-width and turn the toes out only as far as is comfortable.
- Bend the knees in the same general direction as the toes.
- Keep the torso tall and the feet grounded.
- Lower only to the point where you can stay controlled.
- Take 5–8 steady breaths, then straighten the legs slowly.
Key Cue
Keep the whole foot connected to the floor and avoid forcing the knees wider than they naturally track.
Easier Version
Use a narrower stance, stay higher, or lightly hold a chair.
If You Want More Challenge
If steady, rise and lower slowly through a small comfortable range.
5. Low Lunge (Anjaneyasana) with Glute Focus
How to Do It
Low Lunge combines a front-leg strength demand with a stretch through the front of the opposite hip.
- From hands and knees or Downward Dog, step one foot forward.
- Lower the back knee to padding if needed.
- Keep the front foot planted and choose a knee angle that feels stable.
- Bring the hands to blocks, a chair, or the front thigh for support.
- Take a few steady breaths, then switch sides.
Key Cue
Press the front foot into the floor and keep the pelvis as steady as you comfortably can.
Easier Version
Shorten the stance or keep both hands supported.
If You Want More Challenge
Use less hand support only when the position feels stable.
6. Half Moon Pose (Ardha Chandrasana)
How to Do It
Half Moon combines lateral hip control with single-leg balance, so treat the wall or block as part of the pose.
- Start beside a wall with one hand on a block, chair, or the floor.
- Shift weight into the standing leg.
- Lift the other leg only as high as you can stay steady.
- Rotate the torso open only to a comfortable range.
- Take 2–4 steady breaths, come out slowly, and switch sides.
Key Cue
Keep your gaze on one fixed point and prioritize steadiness over height.
Easier Version
Keep the back foot on the wall or use a chair and block together.
If You Want More Challenge
Use lighter fingertip support rather than removing support completely.
7. Locust Pose (Salabhasana)
How to Do It
Locust uses the back-body muscles while you lie prone, giving the routine another way to work hip extension.
- Lie on your belly with the arms alongside the body or hands under the shoulders.
- Lengthen through the legs before lifting anything.
- Lift the chest, legs, or both only a small comfortable amount.
- Keep the back of the neck long and continue breathing.
- Hold for 2–4 breaths, then lower and rest.
Key Cue
Think about length before height; a small lift is enough.
Easier Version
Lift the chest only or one leg at a time.
If You Want More Challenge
Add one steady breath before adding height.
8. Fire Hydrant (Modified Tabletop)
How to Do It
Fire Hydrant adds a side-hip movement from a stable tabletop position.
- Start on hands and knees.
- Keep one knee bent and lift it gently out to the side.
- Stop before the pelvis rolls open.
- Lower with control.
- Repeat 6–10 times, then switch sides.
Key Cue
Make the movement smaller if the trunk twists or the supporting hip collapses.
Easier Version
Make the lift smaller; if hands-and-knees work is uncomfortable, skip this pose and use Bridge instead.
If You Want More Challenge
Slow the lowering phase before adding a resistance band.
9. Donkey Kicks (Modified Tabletop)
How to Do It
Donkey Kicks use a bent-knee hip-extension pattern from tabletop.
- Start on hands and knees.
- Keep one knee bent and lift that thigh only until the pelvis wants to stay level.
- Press the heel gently back rather than arching the lower back.
- Lower with control.
- Repeat 6–10 times, then switch sides.
Key Cue
Keep the movement at the hip; a smaller range is often more useful than a high kick.
Easier Version
Use a smaller lift; if tabletop is uncomfortable, skip this pose and use Bridge instead.
If You Want More Challenge
Add a slower tempo before adding external resistance.
10. Pigeon Prep or Figure-Four Stretch
How to Do It
Use this as a comfortable hip stretch after the strengthening work. Pigeon is optional; Figure Four is an equally valid choice.
- For Pigeon Prep, bring one knee forward from hands and knees and keep the front foot in a comfortable position.
- Support the front hip with a folded blanket or block if needed.
- Stay upright or fold forward only if the position remains comfortable.
- For Figure Four, lie on your back and cross one ankle over the opposite thigh.
- Stay for a few easy breaths, then switch sides.
Key Cue
A stretch should feel like manageable tension, not a joint pinch or sharp pain.
Easier Version
Choose the supine Figure Four instead of Pigeon, or reduce the range.
If You Want More Challenge
There is no need to push deeper; use slower breathing or a slightly longer comfortable hold instead.
How Often to Repeat This Workout
There is no single evidence-based weekly frequency for this exact flow. As a broader benchmark, CDC guidance says adults should include muscle-strengthening activity on at least 2 days each week. Use that as context rather than a mandate to repeat this full sequence on a fixed schedule. If you are still sore, tired, or losing control of the movements, choose Rest or a Short practice in the tracker instead of forcing a full session.
28-Day Glute Practice Tracker
Use this after each session. Click a day to cycle through Short practice, Full practice, Rest day, and Not logged. Shorter sessions still count; the goal is to notice your practice pattern, not chase a perfect streak.
Nothing logged yet.
After your next session, mark it Short or Full. Use Rest for an intentional recovery day.
Frequently Asked Questions
Build the Version You’ll Actually Repeat
Start with the Short practice, mark what you actually did in the tracker, and add poses or volume only when the movements still feel controlled. Use the wall, chair, or block whenever they make the practice more workable; support is part of the routine, not a step you have to outgrow.
If even the Short practice feels like too much standing or floor work today, switch to one of these gentle yoga sequences. The goal is not a perfect 28 days; it is a version of practice you can keep returning to.