If you want yoga to feel like strength work, start with familiar poses you can control and make them gradually more demanding. This full-body yoga sequence for strength uses familiar poses such as Plank, Chair, Warrior II, Side Plank, Bridge, and Locust, with easier and harder versions throughout. You do not need Crow or a full Chaturanga to make this a strength practice.
Start with the version you can control without pain or losing steady form. Yoga can build muscular endurance and bodyweight strength, while progressive resistance training gives you more precise ways to increase load and volume when maximum strength or muscle growth is the goal. If stiffness limits the poses more than strength does, start with the Complete Yoga Flexibility Guide.
Table of Contents
- Build Your Strength Mini-Flow
- Before You Start: Choose a Version You Can Control
- Full-Body Yoga Sequence for Strength
- How Yoga Builds Strength
- How to Make the Sequence Harder (or Easier)
- Frequently Asked Questions
- Build Strength Without Chasing Advanced Poses
If you want a short version first, use the selector below to match the flow to what you want to strengthen and how much challenge feels right today.
Build Your Strength Mini-Flow
Choose one focus and one challenge level. You’ll get a short starting flow plus a link into the matching part of the sequence below.
Choose a focus and challenge level to see your mini-flow.
Before You Start: Choose a Version You Can Control
This routine assumes you can move between standing and floor positions. If that transition is uncomfortable or you are returning after a long break, the selector’s Gentle start option—or one of these gentle yoga sequences—is a better place to begin.
- Newer to strength-focused yoga: Use knees-down Plank, a shallower Chair, and wall support for balance.
- Regular practitioners: Add time, range, or a harder variation before assuming you need Crow or another advanced pose.
- Older adults or anyone easing back into movement: Keep the first round conservative and use support wherever it improves control.
- Wrist- or shoulder-sensitive days: Skip Crow and full Chaturanga; use knees-down or forearm-based options instead.
NCCIH’s yoga safety guidance notes that older adults and people with health conditions may need to avoid or modify some poses and discuss individual needs with a health care provider and yoga instructor.
Set Up for the First Round
Make the first round easier than you think you need. You can always add challenge once the movement feels steady.
- Warm up gradually: Start with easier movement before longer holds or harder variations.
- Let pain change the plan: Reduce the range, use support, choose another variation, or stop the pose rather than pushing through pain.
- Use props for access: Blocks, a wall, or a strap can make a position easier to control; they are not tools for forcing more depth.
- Protect sensitive wrists and shoulders: Knees-down Plank and forearm options still train strength. Crow and full Chaturanga are optional.
- Clear your space: Give yourself enough room to step, kneel, and come down to the floor without rushing.
If standing-to-floor transitions feel like too much on a stiff morning, try a seated routine first.
Full-Body Yoga Sequence for Strength
These strength yoga poses train your core, legs, shoulders, glutes, and back. Full-flow order: warm-up → Plank → Side Plank → Chair → Warrior II → Warrior III → optional Chaturanga/Crow → Bridge → Locust. The main flow blocks add up to about 32–42 minutes; including the optional upper-body/arm-balance block brings the listed total to about 40–52 minutes. Use the mini-flow when you want a shorter session.
How Long to Hold Five Main Poses
| Pose | Starting hold | Main challenge | Easier option |
|---|---|---|---|
| Plank Pose | 10–30 sec | Core, arms, shoulders | Knees on mat |
| Side Plank | 2–5 breaths/side | Obliques, shoulders, balance | Bottom knee down |
| Chair Pose | 3–8 breaths | Quads, glutes, core | Shallower bend |
| Warrior II | 3–8 breaths/side | Legs, glutes, trunk | Shorter stance |
| Bridge Pose | 5–10 breaths | Glutes, hamstrings | Lift only partway |
Warm-Up Flow (5–7 Minutes)
Start with one or two easy rounds. Step rather than jump if you want less impact or more time to organize the movement.
- Cat-Cow (Marjaryasana-Bitilasana): On all fours, inhale to lift the chest and tailbone; exhale to round the spine. Repeat 5–8 times at a comfortable range.
- Thread the Needle: From hands and knees, reach one arm up, then thread it under the opposite arm. Rest only as far as your shoulder and neck are comfortable. Take 3–5 breaths per side.
- Modified Sun Salutation: Move from Mountain to Forward Fold and Halfway Lift, step back to Plank or knees-down Plank, lower to the belly with control, rise into a comfortable Cobra, then return through Downward-Facing Dog or Tabletop before stepping forward. Repeat 1–3 rounds.
Core Strength Builders (8–10 Minutes)
For a focused routine, use the full yoga sequence for core strength. Here, Plank and Side Plank provide the main trunk challenge.
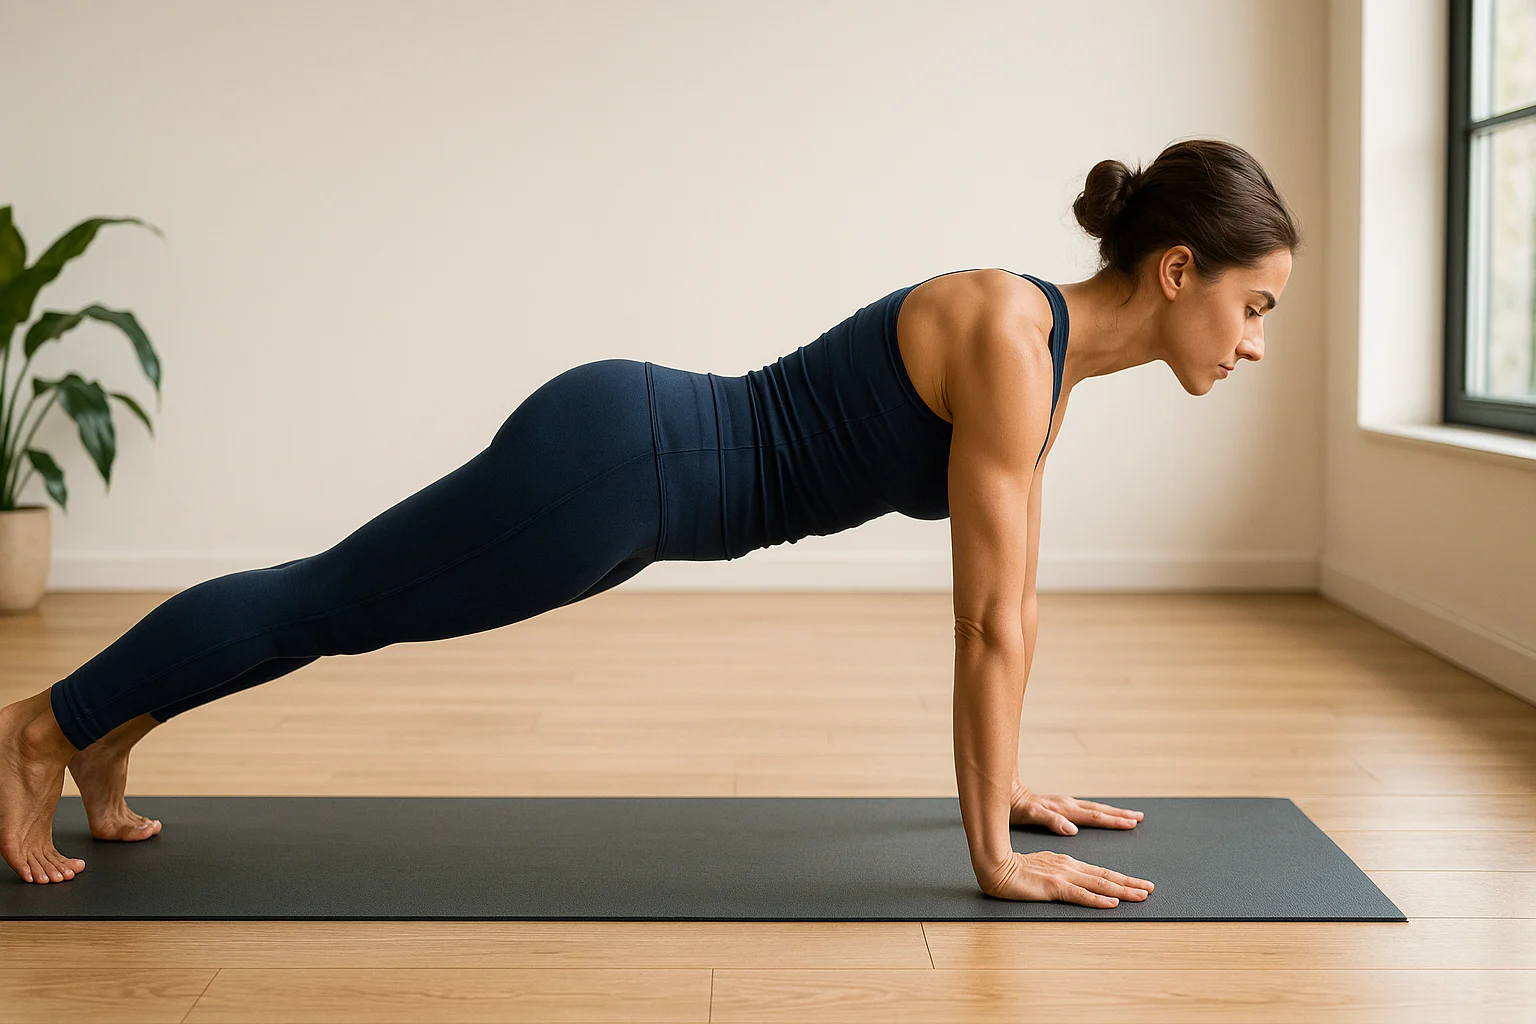
Plank Pose (Phalakasana)
- How to: From hands and knees, step the feet back into Plank or keep the knees down. Place hands under or slightly ahead of the shoulders and lengthen from the crown of the head through the heels or knees.
- Alignment tips: Press the floor away, keep the trunk steady, and choose a hand position that lets the wrists and shoulders feel controlled.
- Main challenge: Core, shoulders, arms, and quads work together to resist sagging or piking.
- Progression: Begin with 10–20 seconds or a few steady breaths. Add time gradually, or move from knees-down to full Plank when the position stays controlled.
Reset: Rest in Child’s Pose or come to hands and knees before the next effort.
Side Plank (Vasisthasana)
- How to: From Plank or a knees-down variation, turn onto one side. Keep the bottom knee down for more support, or stack/stagger the feet for more challenge.
- Alignment tips: Press the supporting hand or forearm into the floor, keep the shoulder away from the ear, and lift only as high as you can control.
- Main challenge: Obliques, shoulders, hips, and balance.
- Progression: Add one breath at a time before moving to a harder variation. A forearm variation can reduce wrist load.
Reset: Return to hands and knees or use Thread the Needle if that feels good.
Leg Strength Poses (8–10 Minutes)
Chair and Warrior II let you scale leg work without needing a more complex pose.
Chair Pose (Utkatasana)
- How to: From Mountain Pose, bend the knees and send the hips back as if sitting toward a chair. Keep the whole foot grounded and lift the chest comfortably.
- Alignment tips: Let the knees travel only as far as feels comfortable while they track in the same general direction as the toes. Choose a depth you can hold without pain.
- Main challenge: Quads, glutes, core, and ankles.
- Progression: Start shallow. Add a breath or a little range before trying heel lifts or twists.
Reset: Stand tall or use an easy Forward Fold if it feels comfortable.
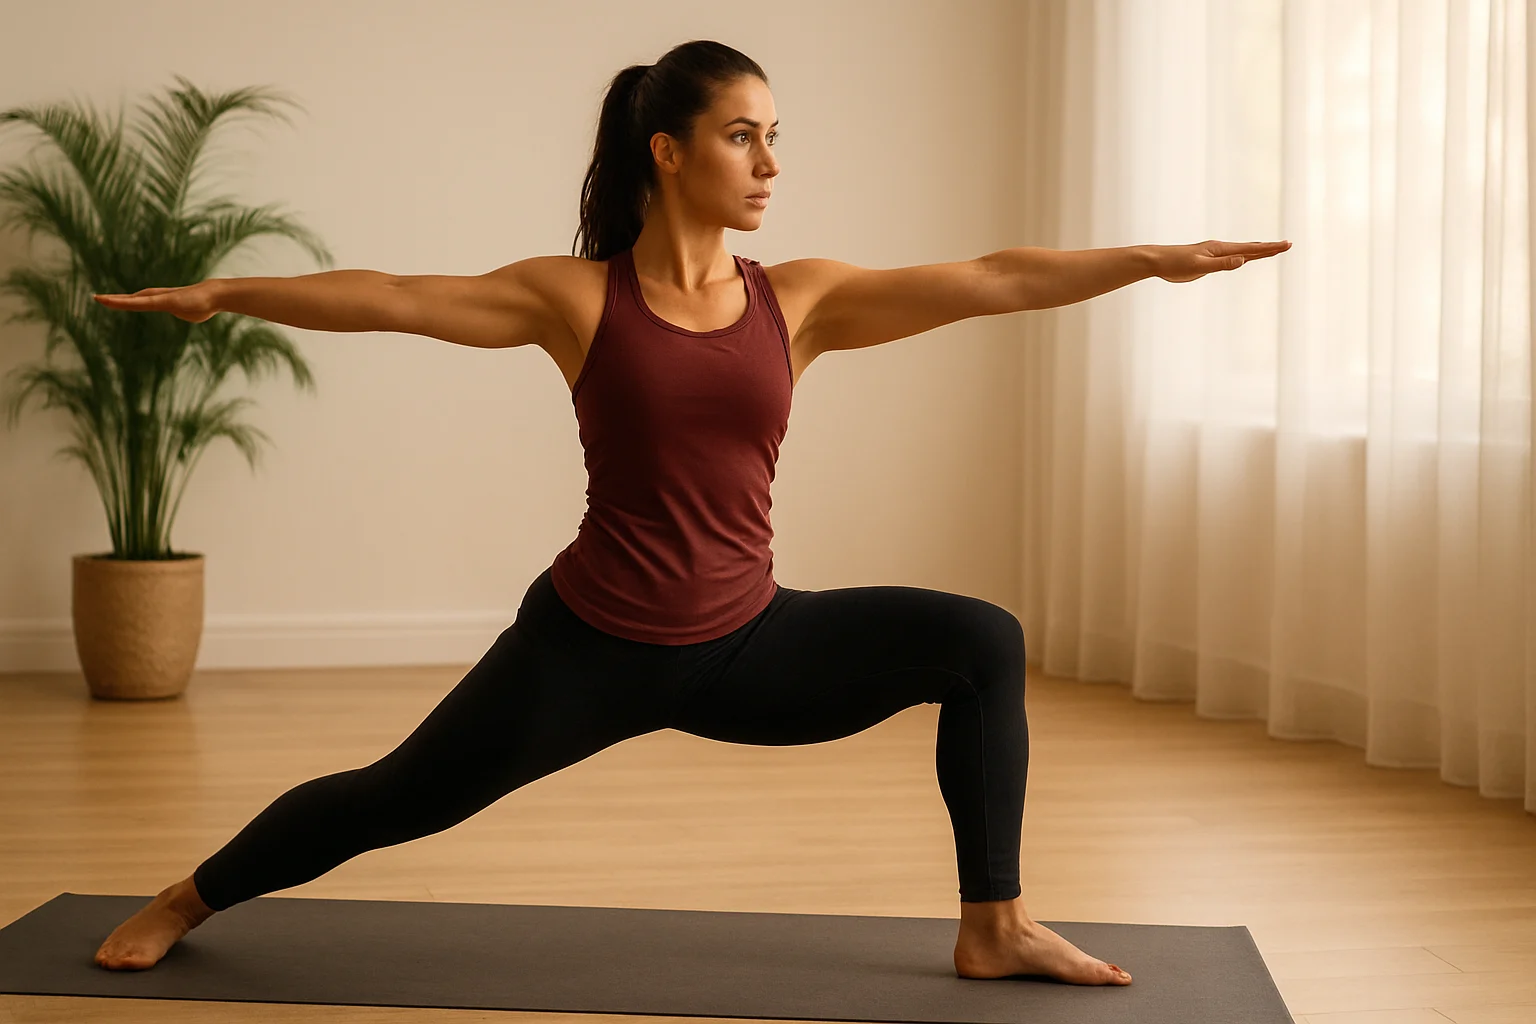
Warrior II (Virabhadrasana II)
- How to: Take a comfortable wide stance, turn the front foot forward, and bend the front knee to a depth you can control. Extend the arms without tensing the shoulders.
- Alignment tips: Keep steady pressure through both feet and let the front knee track with the toes. Shorten the stance or reduce the bend if the knee or hips feel strained.
- Main challenge: Quads, glutes, trunk, and shoulder endurance.
- Progression: Add time before depth. A longer hold is enough; you do not need to force a 90-degree knee bend.
Reset: Straighten the front leg or step into a comfortable stance. If tight hamstrings are the main limiter elsewhere in the flow, use these yoga hamstring stretches as a separate mobility practice.
Glute and Balance Poses (6–8 Minutes)
Balance work is useful when the goal is control, not how high you can lift the back leg.
Warrior III (Virabhadrasana III)
- How to: Shift weight into one foot and hinge forward while the other leg reaches back. Keep hands on a wall or blocks if that helps you stay organized.
- Alignment tips: Keep a soft bend in the standing knee, lengthen the spine, and lift the back leg only as high as you can keep the pelvis steady.
- Main challenge: Standing-leg strength, glutes, back, core, and balance.
- Progression: Use less hand support or add one breath at a time before reaching the arms forward.
Reset: Stand tall and shake out the legs before changing sides.
Upper-Body Strength + Optional Arm Balance (8–10 Minutes)
Plank variations already train the upper body. Chaturanga and Crow can add challenge, but neither is required for an effective strength yoga practice.
Chaturanga Dandasana (Four-Limbed Staff Pose)
- How to: From Plank or knees-down Plank, shift slightly forward and bend the elbows back. Lower only as far as you can keep the trunk controlled and the shoulders at or above elbow height.
- Alignment tips: Keep the elbows close without squeezing them rigidly to the ribs. If the wrists or shoulders feel strained, lower the knees or come all the way to the belly instead.
- Main challenge: Chest, triceps, shoulders, and core.
- Progression: Start knees-down and slow the lowering phase. Use a full-Plank version only when it feels stable; there is no need to hold at the bottom.
Reset: Use a comfortable Cobra or come back to hands and knees.
Optional: Crow Pose (Bakasana)
Crow is optional: It is a balance skill as much as a strength challenge, so skipping it does not make the sequence less effective.
- How to: From a squat, place the hands shoulder-width apart and bring the knees onto the upper arms. Shift forward gradually while keeping one or both toes down until the balance feels familiar.
- Alignment tips: Press through the hands, round the upper back gently, and look slightly forward rather than straight down.
- Main challenge: Wrists, arms, shoulders, core, and balance.
- Progression: Practice a controlled weight shift or one-foot hover first. Lift both feet only if the setup is already familiar and comfortable.
Reset: Come back to a squat, hands and knees, or Child’s Pose.
Back & Glute Strengtheners (5–7 Minutes)
Finish with floor-based back-and-glute work that does not rely on wrist loading.
Bridge Pose (Setu Bandhasana)
- How to: Lie on your back with knees bent and feet about hip-width apart. Press into the feet and lift the hips only as high as you can keep the neck relaxed.
- Alignment tips: Keep the knees tracking roughly over the feet and the back of the neck long. Arms can rest by the sides.
- Main challenge: Glutes, hamstrings, and back-body endurance.
- Progression: Begin with a partial lift, then add hold time. A supported Bridge with a block under the sacrum is a different, more restful variation—not the strength progression.
Reset: Lower slowly and bring the knees toward the chest if that feels comfortable.
Locust Pose (Salabhasana)
- How to: Lie on the belly with arms by the sides. Lengthen through the crown of the head, then lift the chest and legs only as high as the back of the body can support without straining the neck.
- Alignment tips: Reach long through the legs and draw the shoulder blades gently back rather than squeezing them hard together.
- Main challenge: Back extensors, glutes, hamstrings, and shoulder stabilizers.
Reset: Lower fully, turn the head to one side, or rest in Child’s Pose.
How Yoga Builds Strength
Yoga uses your body as resistance. Holds such as Plank and Chair emphasize muscular endurance, while controlled transitions and balances add coordination and stability. Traditional resistance training can also use compound movements, so the useful distinction is not “yoga works the whole body while weights isolate muscles.” Yoga simply combines resistance, balance, mobility, and breath in one practice.
A randomized trial of sedentary older adults reported that eight weeks of Hatha yoga improved measures of functional fitness, with changes comparable to a stretching-strengthening program. That is useful evidence, but it does not mean every yoga style or sequence produces the same result.
If your goal is muscle-building yoga, focus less on advanced pose names and more on whether the work becomes progressively harder over time. For maximum strength or muscle growth, treat yoga as one training tool rather than a complete substitute for progressive resistance work. ACSM’s resistance-training guidance emphasizes consistency and matching load and volume to the goal.
How to Make the Sequence Harder (or Easier)
Progress one variable at a time. Advanced poses are optional; the goal is a little more useful challenge without losing control.
- Hold time: Add one or two breaths to a pose before making the shape harder.
- Range: Deepen Chair or Warrior II only when the extra range still feels comfortable and steady.
- Pose version: Move from knees-down to full Plank, or from bottom-knee Side Plank to a straighter-leg version.
- Volume: Repeat one short mini-flow rather than making every pose more advanced.
- Support: Keep a wall, block, or knee-down option as long as it improves your control. Needing support is not a failed progression.
A 4-Week Progression Example
Use this as a sample, not a deadline. Repeat a week whenever the next step would make your form less steady.
- Week 1 — Find your baseline: Use supported versions and short holds, such as 10–20 seconds in Plank or 3–5 breaths in Chair and Warrior II.
- Week 2 — Add a little time: Add one or two breaths to two poses, or repeat one mini-flow once. Keep the other variables the same.
- Week 3 — Make one pose harder: Try a full Plank for part of the hold, use less wall support in Warrior III, or straighten the bottom leg in Side Plank if control stays good.
- Week 4 — Consolidate: Choose the version that now feels challenging but repeatable. You can progress again later; Crow and full Chaturanga are not graduation requirements.
A Seated 10-Minute Routine for Rest Days
This one won’t build strength — it’s a gentle seated routine for the days between sessions, when you want to move without loading anything.
Confirm to get the routine and yoga tips. Unsubscribe anytime.
Something went wrong. Please check your email address and try again.
Frequently Asked Questions
Build Strength Without Chasing Advanced Poses
The useful benchmark is not whether you can hold a 60-second Plank or lift into Crow. Look for steadier holds, an extra breath with good form, a little less support, or a second round that still feels controlled. Those are more useful signs of progress than moving to a harder-looking pose.
If you also lift weights, use yoga for weight training to decide where yoga and mobility fit around your strength sessions.