Wrists feeling stiff in Downward Dog, Plank, or after a long stretch at the keyboard? These yoga wrist stretches combine a short warm-up, gentle forearm stretches, and lower-load pose options so you can explore movement without forcing range. The useful rule is simple: warm first, then add load gradually.
This post contains affiliate links. If you purchase through them, we may earn a commission at no extra cost to you. As an Amazon Associate, I earn from qualifying purchases. Learn more.
Table of Contents
- A 1-Minute Wrist Warm-Up
- 7 Yoga Wrist Stretches and Modifications
- Why Wrist Stretches Feel Different Under Load
- When to Use These Wrist Stretches
- When Wrist Pain Means Stop
- Common Questions About Wrist Stretches
- Start with the Range Your Wrists Have Today
A 1-Minute Wrist Warm-Up
Before weight-bearing, spend about a minute moving the hands and wrists without loading them. Keep the range easy and comfortable:
- Gentle Shakes: Shake your hands loosely for 15-30 seconds, like shaking off water.
- Open and Close Fists: Close your hands into comfortable fists, then spread the fingers wide. Repeat 10-15 times.
- Wrist Circles (Small): Make small wrist circles, 5-10 in each direction.
- Finger Wiggles: Wiggle each finger individually, then all together.
7 Yoga Wrist Stretches and Modifications
Use these as a menu, not a test you have to pass. The seven options below mix wrist mobility poses, forearm stretches, and lower-load yoga modifications. For desk stiffness, start with the one-minute warm-up and the flexor or extensor stretches. If the wrists mainly feel awkward when you load the hands in Downward Dog or Plank, start with Tabletop rolls or wrist rocks and the elevated or forearm variations.
Try weight-bearing only if it feels comfortable. If wrist loading is part of your strength practice, the same gradual-loading rule also matters when combining yoga with weight training: add load gradually rather than forcing range.
| Stretch Name | Duration/Reps | Main Purpose |
|---|---|---|
| Tabletop Wrist Rolls | 3-5 circles each direction | Gentle multi-direction warm-up before loading the hands |
| Downward Dog Modifications | 5-10 breaths | Reduces wrist loading while keeping a similar yoga shape |
| Tabletop Wrist Rocks | 5-8 slow rocks | Gentle weight-bearing practice for wrist extension |
| Prayer Wrist Stretch | 15-30 seconds | Palms-together wrist and forearm stretch |
| Wrist Flexor Stretch | 20-30 seconds per side | Forearm stretch after typing or gripping |
| Wrist Extensor Stretch | 20-30 seconds per side | Back-of-forearm stretch for comfortable wrist movement |
| Finger Stretches | 10-15 seconds per finger | Finger movement and hand reset |
1. Tabletop Wrist Rolls for Wrist Mobility
This low-load movement lets you explore several wrist angles before asking the hands to support more body weight.
- Start in Tabletop: On hands and knees, align shoulders over wrists, hips over knees. Spread fingers wide, pressing through fingertips.
- Rotate Hands Forward: Point fingertips forward.
- Rotate Sideways: Turn fingertips to the sides, letting the palms stay down only as far as comfortable.
- Rotate Backwards: Gently point fingertips toward knees (ease off if intense). Palms may lift slightly.
- Reverse Circle: Rotate back to sides, then forward.
- Repeat: Do 3-5 slow circles each way.
Tip: Keep elbows slightly bent and weight evenly distributed.
2. Downward Dog Modifications for Wrist Support
Use these when a full, flat-palmed Downward Dog or Plank asks for more wrist extension than feels comfortable.
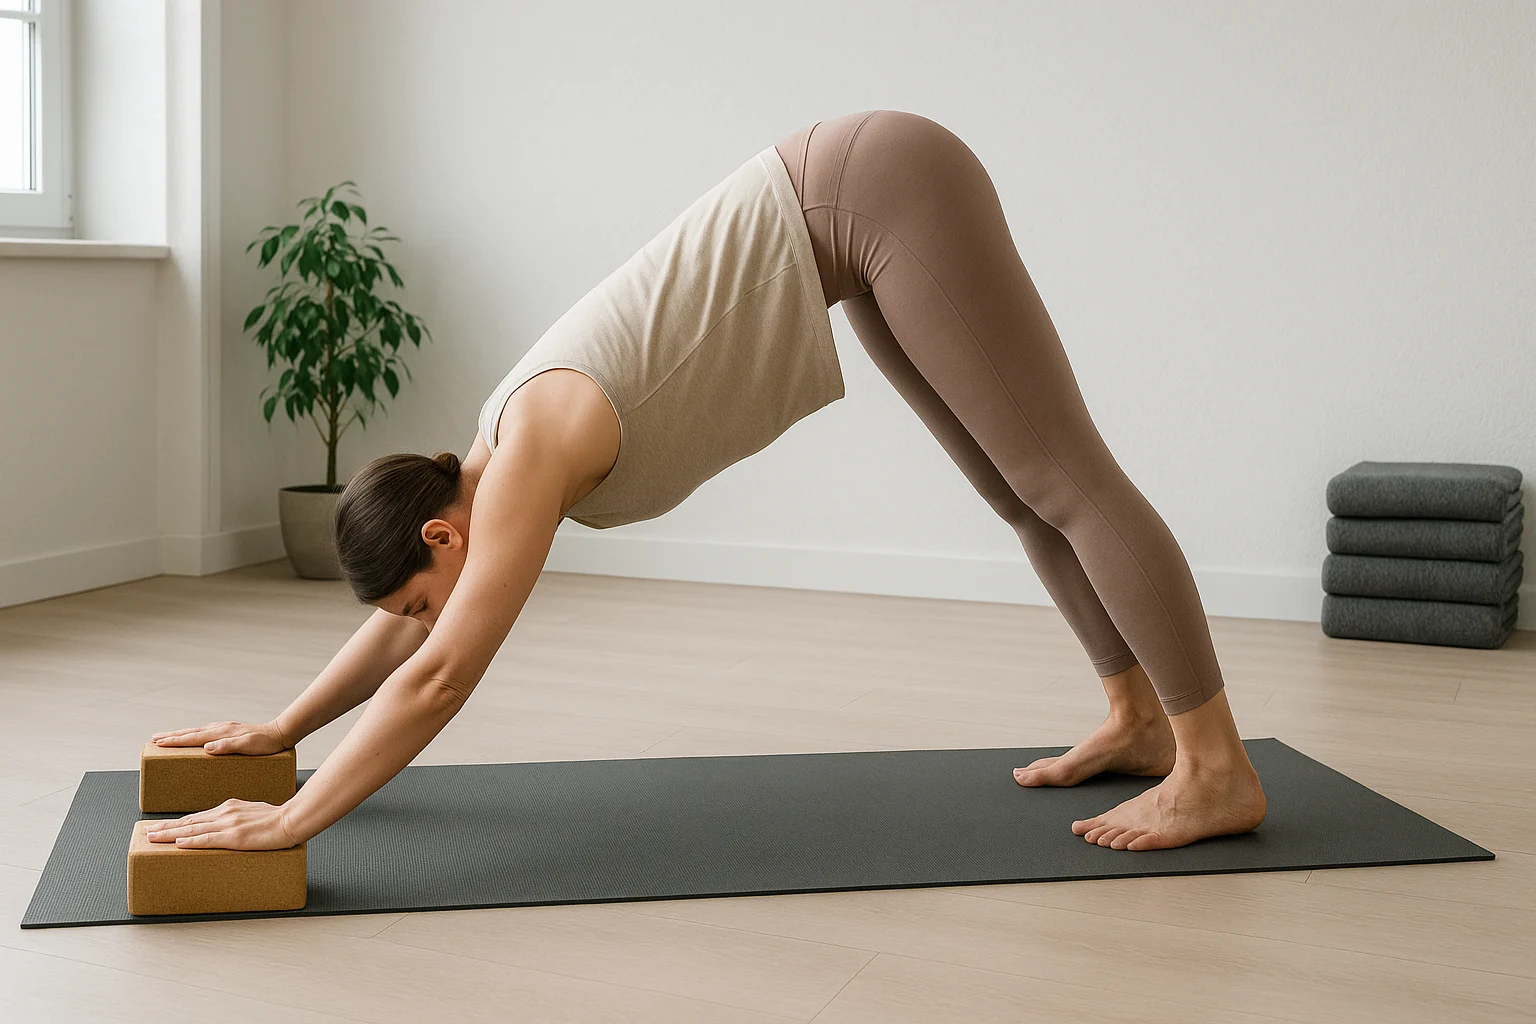
Option A: Elevated Downward Dog
- Find a Prop: Place hands on yoga blocks or a chair.
- Set Up: Hands shoulder-width apart, step feet back, forming an inverted “V.”
- Engage: Press through hands, lift hips high, keep spine long.
- Hold: Breathe for 5-10 breaths.
Option B: Forearm Downward Dog (Dolphin Pose)
- Start in Tabletop: On hands and knees.
- Lower Forearms: Place forearms parallel, elbows under shoulders.
- Lift Hips: Curl toes under, lift hips into an inverted “V.”
- Press: Press through forearms, lift shoulders from ears.
- Hold: Breathe for 5-10 breaths.
Tip: Keep the fingers comfortably spread rather than gripping the mat.
3. Tabletop Wrist Rocks
This adds a small amount of body weight after the unloaded warm-up, so you can test wrist extension without jumping straight to Plank.
- Start in Tabletop: Place hands under shoulders and knees under hips, with fingers pointing forward.
- Spread the Load: Keep the fingers comfortably spread and press through the base of the fingers as well as the heel of the hand.
- Rock Forward: Shift the shoulders slightly forward past the wrists only as far as comfortable.
- Rock Back: Ease the hips back until the wrist pressure decreases.
- Repeat: Move slowly for 5-8 controlled rocks.
Tip: Keep the elbows soft and make the range smaller if the wrists feel compressed.
4. Prayer Wrist Stretch
This palms-together stretch gives you a simpler wrist-extension option than reaching the hands behind the back.
- Bring Palms Together: Place palms together in front of the chest, fingers pointing up.
- Relax Shoulders: Let the elbows angle outward comfortably.
- Lower Hands: Keeping the palms together, slowly lower the hands toward the waist until you feel a mild stretch through the inner forearms.
- Hold: Stay for 15-30 seconds, breathing normally.
- Ease Out: Raise the hands back toward the chest before separating the palms.
Tip: Keep the stretch mild; stop if it brings on pain, tingling, or numbness.
5. Wrist Flexor Stretch After Typing
Great after a long stint at the keyboard—this one targets the forearm flexors.
- Extend Arm: Stretch one arm forward, palm facing forward, fingers up.
- Draw Hand Back: Use the other hand to gently draw the palm and fingers toward you.
- Feel Stretch: Sense the stretch along the underside of the forearm (palm side).
- Hold: 20-30 seconds per side.
Tip: Keep elbow straight but not locked.
6. Wrist Extensor Stretch
This targets the back of the forearm and can be useful after typing or other repetitive hand work.
- Extend Arm: Stretch one arm forward, palm down, fingers pointing toward the floor.
- Draw Hand In: Use the other hand to gently draw the hand toward your body.
- Feel Stretch: You’ll feel a stretch along the top of the forearm (back-of-hand side).
- Hold: Stay there for 20-30 seconds per side.
Tip: If this brings on tingling or numbness, stop rather than stretching through it. Recurring or worsening numbness, tingling, or weakness deserves medical advice.
7. Finger Stretches and Splays
Finish with the fingers if your hands feel stiff after gripping, typing, or supporting weight on the mat.
Individual Finger Stretch
- Stretch one hand out, palm facing up.
- Gently pull one finger back toward your forearm, nice and easy.
- Hold for 10-15 seconds per finger, then switch to the other hand.
Finger Splay
- Make a loose fist, nothing too tight.
- Spread your fingers wide, like you’re stretching them out after a long day.
- Hold 5 seconds, relax. Repeat 5-10 times.
Tip: Keep the pull gentle; the fingers do not need a hard stretch.
If flat-palmed weight-bearing is the part that still feels awkward, a yoga wedge is one optional prop to compare with the chair or forearm variations above. The StrongTek Yoga Foam Wedge Blocks give your hands an angled surface for floor exercises such as Plank. If you have ongoing pain, numbness, or tingling, skip the prop experiment and use the caution guidance below instead.
Why Wrist Stretches Feel Different Under Load
Yoga often asks the wrists to extend while the hands are bearing body weight, especially in Tabletop, Plank, Downward Dog, and arm balances. That is why wrist flexibility in yoga cannot be judged by unloaded range alone: hand position, forearm strength, shoulder control, and how much weight you ask the wrists to take all matter.
That is why the routine above mixes mobility with easier weight-bearing options. The goal is not to force a bigger range; it is to find a range you can control and then build from there. For mobility beyond the wrists, continue with our Yoga Flexibility Guide.
When to Use These Wrist Stretches
You do not need a separate long wrist session. Use the low-load movements when they solve a real moment: before hand-heavy yoga, after a long stretch at the keyboard, or as a gentle mobility break. If sitting is the bigger issue, pair the wrist moves with our 5-minute desk yoga routine for a broader movement break:
- Desk Breaks: Use a few circles, finger movements, or a gentle forearm stretch when your hands feel stiff from computer work.
- Before Yoga: Warm up before poses that place substantial weight through the hands.
- Separate Mobility From Loading: Wrist circles can be frequent and gentle; heavier weight-bearing work should progress more gradually.
- Listen to Your Body: Adjust intensity based on how your wrists feel.
When Wrist Pain Means Stop
A stretch sensation and pain are not the same thing. Stop or modify the movement when symptoms become sharp, electric, tingling, numb, or progressively worse:
- Stop at Sharp Pain: A mild stretch sensation may be okay, but sharp pain is not a target—pause and ease out.
- Avoid Injury: If you have a wrist injury or intense pain, check in with a healthcare professional before starting or changing your routine.
- Watch for Numbness or Tingling: Stop the stretch if these symptoms appear. If numbness, tingling, or weakness recurs or worsens, seek medical advice rather than trying to stretch through it.
- Go Slow: Avoid bouncing or forcing movements.
Carpal tunnel syndrome is a nerve-compression condition, not simply a flexibility problem. The American Academy of Orthopaedic Surgeons notes that therapeutic exercises may be one part of care and are often used alongside other measures. If wrist symptoms are persistent, worsening, or include numbness, tingling, or weakness, get individualized guidance.
If desk sitting is what loads your wrists in the first place, the routine below gives you a seated practice that keeps weight off your hands entirely.
A Chair-Yoga Routine for Stiff Mornings
A 17-page chair-yoga PDF for stiff mornings, delivered after you confirm your email.
Confirm to get the routine and yoga tips. Unsubscribe anytime.
Something went wrong. Please check your email address and try again.
Common Questions About Wrist Stretches
Start with the Range Your Wrists Have Today
You do not need to force your palms flatter or chase a bigger stretch. Start with the one-minute warm-up, choose two or three movements that feel useful, and use the elevated or forearm versions when full weight-bearing is too much. The best next step is the version you can repeat comfortably and control.
If you want a full practice built around the same lower-pressure approach, try one of our gentle yoga sequences. For your next practice, pick one hand-heavy pose and test the easiest version first—elevated hands or forearms if that feels better. Stay there until the position feels steady and comfortable before asking your wrists to take more load.